目前分類:ESP模組應用 (27)
- May 06 Wed 2020 10:22
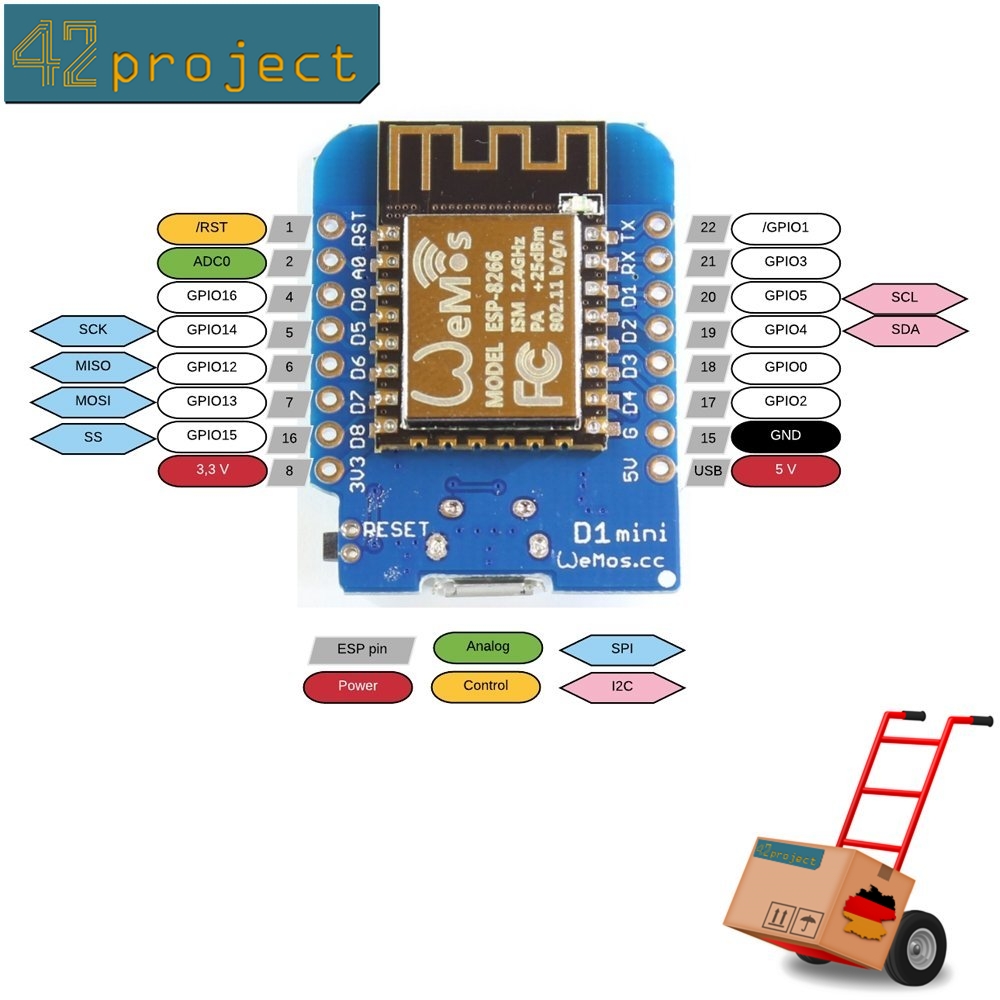
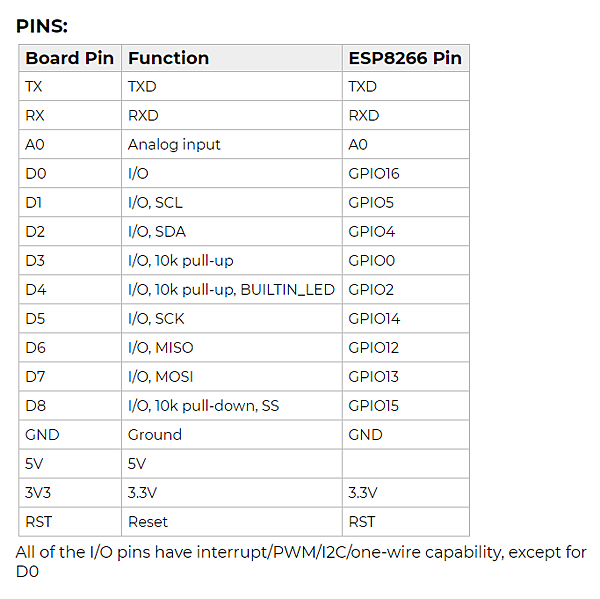
Wemos D1 Mini 腳位
- Mar 14 Thu 2019 12:36
EspWifiTracker
- Sep 29 Sat 2018 14:37
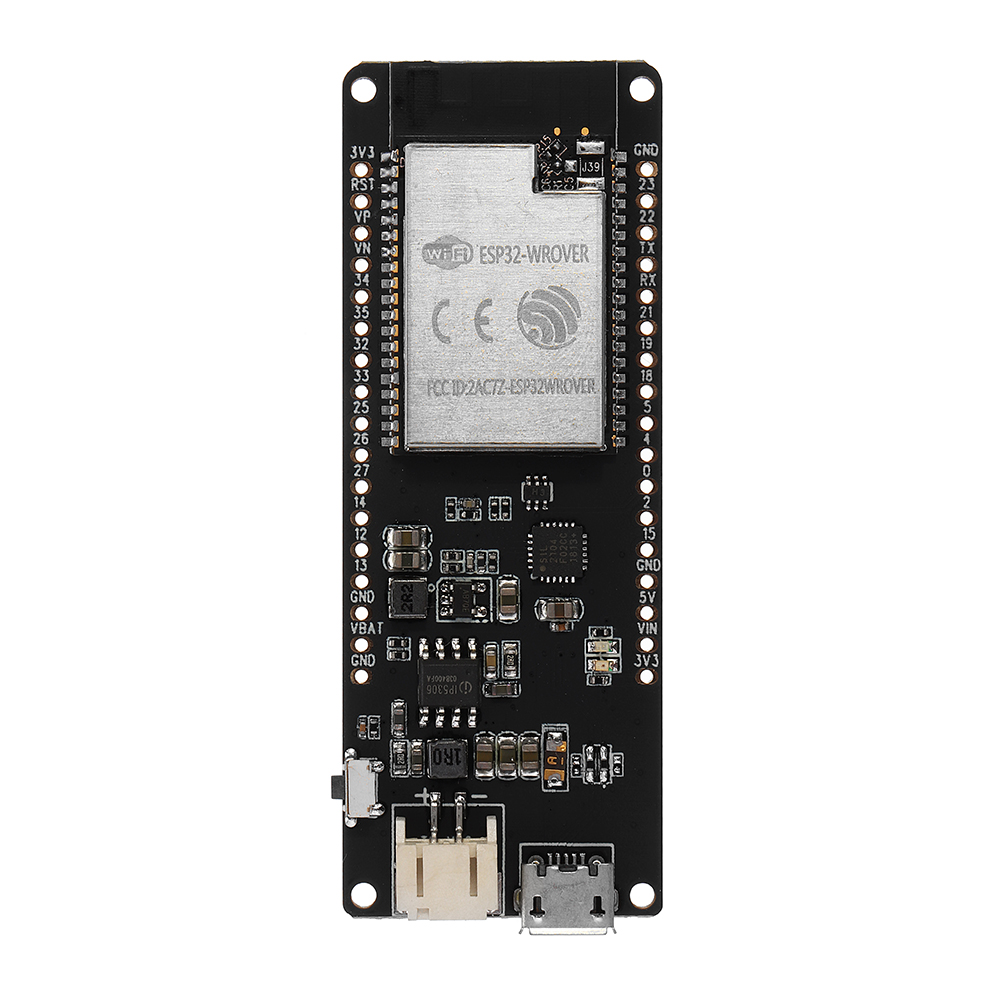
TTGO ZERO ESP32 筆記
參考資料:http://esp32-ttgo.blogspot.com/
https://www.aliexpress.com/item/TTGO-ZERO-ESP32-4-MB-PSRAM-4-MB-Flash-WiFi-Module-Bluetooth-ESP32-WROVER-Micropython/32858716536.html?spm=a2g0s.9042311.0.0.590f4c4dCZxodC
TTGO ZERO ESP32 PSRAM 4 MB Flash WiFi Module Bluetooth ESP32-WROVER Micropython
Espressif official ESP32-WROVER module
Lastest ESP32 Version: REV1
WIFI
Bluetooth
4MB Flash
4MB PSRAM
Default firmware: Latest Micropython firmware
Battery Connector: PH-2 2.0mm
2A Battery Management
Power button: Click one time will start. Fast click 2 times will shut down.
Protection: Short protection. Over charging protection. Overflowing
- Mar 28 Wed 2018 06:11
Micropython OS Errors 和意義
Micropython OS return code ,代碼可能有些不同,但錯誤意義可以參考
errno-base.h
#ifndef _ASM_GENERIC_ERRNO_BASE_H
#define _ASM_GENERIC_ERRNO_BASE_H

#define EPERM        1  /* Operation not permitted */
#define ENOENT       2  /* No such file or directory */
#define ESRCH        3  /* No such process */
#define EINTR        4  /* Interrupted system call */
#define EIO          5  /* I/O error */
#define ENXIO        6  /* No such device or address */
#define E2BIG        7  /* Argument list too long */
#define ENOEXEC      8  /* Exec format error */
#define EBADF        9  /* Bad file number */
#define ECHILD      10  /* No child processes */
#define EAGAIN      11  /* Try again */
#define ENOMEM      12  /* Out of memory */
#define EACCES      13  /* Permission denied */
#define EFAULT      14  /* Bad address */
#define ENOTBLK     15  /* Block device required */
#define EBUSY       16  /* Device or resource busy */
#define EEXIST      17  /* File exists */
#define EXDEV       18  /* Cross-device link */
#define ENODEV      19  /* No such device */
#define ENOTDIR     20  /* Not a directory */
#define EISDIR      21  /* Is a directory */
#define EINVAL      22  /* Invalid argument */
#define ENFILE      23  /* File table overflow */
#define EMFILE      24  /* Too many open files */
#define ENOTTY      25  /* Not a typewriter */
#define ETXTBSY     26  /* Text file busy */
#define EFBIG       27  /* File too large */
#define ENOSPC      28  /* No space left on device */
#define ESPIPE      29  /* Illegal seek */
#define EROFS       30  /* Read-only file system */
#define EMLINK      31  /* Too many links */
#define EPIPE       32  /* Broken pipe */
#define EDOM        33  /* Math argument out of domain of func */
#define ERANGE      34  /* Math result not representable */

#endif
errno.h
#ifndef _ASM_GENERIC_ERRNO_H
#define _ASM_GENERIC_ERRNO_H

#include <asm-generic/errno-base.h>

#define EDEADLK     35  /* Resource deadlock would occur */
#define ENAMETOOLONG    36  /* File name too long */
#define ENOLCK      37  /* No record locks available */
#define ENOSYS      38  /* Function not implemented */
#define ENOTEMPTY   39  /* Directory not empty */
#define ELOOP       40  /* Too many symbolic links encountered */
#define EWOULDBLOCK EAGAIN  /* Operation would block */
#define ENOMSG      42  /* No message of desired type */
#define EIDRM       43  /* Identifier removed */
#define ECHRNG      44  /* Channel number out of range */
#define EL2NSYNC    45  /* Level 2 not synchronized */
#define EL3HLT      46  /* Level 3 halted */
#define EL3RST      47  /* Level 3 reset */
#define ELNRNG      48  /* Link number out of range */
#define EUNATCH     49  /* Protocol driver not attached */
#define ENOCSI      50  /* No CSI structure available */
#define EL2HLT      51  /* Level 2 halted */
#define EBADE       52  /* Invalid exchange */
#define EBADR       53  /* Invalid request descriptor */
#define EXFULL      54  /* Exchange full */
#define ENOANO      55  /* No anode */
#define EBADRQC     56  /* Invalid request code */
#define EBADSLT     57  /* Invalid slot */

#define EDEADLOCK   EDEADLK

#define EBFONT      59  /* Bad font file format */
#define ENOSTR      60  /* Device not a stream */
#define ENODATA     61  /* No data available */
#define ETIME       62  /* Timer expired */
#define ENOSR       63  /* Out of streams resources */
#define ENONET      64  /* Machine is not on the network */
#define ENOPKG      65  /* Package not installed */
#define EREMOTE     66  /* Object is remote */
#define ENOLINK     67  /* Link has been severed */
#define EADV        68  /* Advertise error */
#define ESRMNT      69  /* Srmount error */
#define ECOMM       70  /* Communication error on send */
#define EPROTO      71  /* Protocol error */
#define EMULTIHOP   72  /* Multihop attempted */
#define EDOTDOT     73  /* RFS specific error */
#define EBADMSG     74  /* Not a data message */
#define EOVERFLOW   75  /* Value too large for defined data type */
#define ENOTUNIQ    76  /* Name not unique on network */
#define EBADFD      77  /* File descriptor in bad state */
#define EREMCHG     78  /* Remote address changed */
#define ELIBACC     79  /* Can not access a needed shared library */
#define ELIBBAD     80  /* Accessing a corrupted shared library */
#define ELIBSCN     81  /* .lib section in a.out corrupted */
#define ELIBMAX     82  /* Attempting to link in too many shared libraries */
#define ELIBEXEC    83  /* Cannot exec a shared library directly */
#define EILSEQ      84  /* Illegal byte sequence */
#define ERESTART    85  /* Interrupted system call should be restarted */
#define ESTRPIPE    86  /* Streams pipe error */
#define EUSERS      87  /* Too many users */
#define ENOTSOCK    88  /* Socket operation on non-socket */
#define EDESTADDRREQ    89  /* Destination address required */
#define EMSGSIZE    90  /* Message too long */
#define EPROTOTYPE  91  /* Protocol wrong type for socket */
#define ENOPROTOOPT 92  /* Protocol not available */
#define EPROTONOSUPPORT 93  /* Protocol not supported */
#define ESOCKTNOSUPPORT 94  /* Socket type not supported */
#define EOPNOTSUPP  95  /* Operation not supported on transport endpoint */
#define EPFNOSUPPORT    96  /* Protocol family not supported */
#define EAFNOSUPPORT    97  /* Address family not supported by protocol */
#define EADDRINUSE  98  /* Address already in use */
#define EADDRNOTAVAIL   99  /* Cannot assign requested address */
#define ENETDOWN    100 /* Network is down */
#define ENETUNREACH 101 /* Network is unreachable */
#define ENETRESET   102 /* Network dropped connection because of reset */
#define ECONNABORTED    103 /* Software caused connection abort */
#define ECONNRESET  104 /* Connection reset by peer */
#define ENOBUFS     105 /* No buffer space available */
#define EISCONN     106 /* Transport endpoint is already connected */
#define ENOTCONN    107 /* Transport endpoint is not connected */
#define ESHUTDOWN   108 /* Cannot send after transport endpoint shutdown */
#define ETOOMANYREFS    109 /* Too many references: cannot splice */
#define ETIMEDOUT   110 /* Connection timed out */
#define ECONNREFUSED    111 /* Connection refused */
#define EHOSTDOWN   112 /* Host is down */
#define EHOSTUNREACH    113 /* No route to host */
#define EALREADY    114 /* Operation already in progress */
#define EINPROGRESS 115 /* Operation now in progress */
#define ESTALE      116 /* Stale NFS file handle */
#define EUCLEAN     117 /* Structure needs cleaning */
#define ENOTNAM     118 /* Not a XENIX named type file */
#define ENAVAIL     119 /* No XENIX semaphores available */
#define EISNAM      120 /* Is a named type file */
#define EREMOTEIO   121 /* Remote I/O error */
#define EDQUOT      122 /* Quota exceeded */

#define ENOMEDIUM   123 /* No medium found */
#define EMEDIUMTYPE 124 /* Wrong medium type */
#define ECANCELED   125 /* Operation Canceled */
#define ENOKEY      126 /* Required key not available */
#define EKEYEXPIRED 127 /* Key has expired */
#define EKEYREVOKED 128 /* Key has been revoked */
#define EKEYREJECTED    129 /* Key was rejected by service */

/* for robust mutexes */
#define EOWNERDEAD  130 /* Owner died */
#define ENOTRECOVERABLE 131 /* State not recoverable */

#endif
- Dec 30 Sat 2017 06:20
ESP8266 & ESP32 技術文件
- Dec 29 Fri 2017 14:30
ESP8266 RTOS SDK 開發環境(使用VM & Lubuntu)
Downloading the Virtual Machine
Download ESP8266_lubuntu_20141021.ova
from: http://downloads.espressif.com/FB/ESP8266_GCC.zip
解開 ESP8266_GCC_LUBUNTU.ZIP 且參考ESP8266_GCC_LUBUNTU.docx
內有安裝步驟及程序
Download the ESP8266 RTOS SDK
Download ESP8266_RTOS_SDK_V1.5.0.7z from
http://domoticx.com/esp8266-wifi-software-software-development-kit-espressif/
Extract the RTOS SDK (參考http://iot-bits.com/articles/building-examples-in-esp8266-rtos-sdk/)
Compile an example project
- cd /home/esp8266/Share/ESP8266_RTOS_SDK_V1.5.0/example/project_template
- vi gen_misc.sh
- 編輯SDK_PATH=/home/esp8266/Share/ESP8266_RTOS_SDK_V1.5.0
- 編輯BIN_PATH=/home/esp8266/Share/ESP8266_RTOS_SDK_V1.5.0/BIN_dir
- chmod +x gen_misc.sh & ./gen_misc.sh
- 執行完後 BIN_dir 包含 BIN files
Flashing to ESP8266 chip TEST
#--------------------
補充說明:
BIN generation parameters
- STEP 1: use boot_v1.2+ by default
boot mode: new
This boot file is forced by default in the RTOS SDK. Users cannot opt for another version of boot.bin
- STEP 2: choose bin generate(0=eagle.flash.bin+eagle.irom0text.bin, 1=user1.bin, 2=user2.bin)
enter (0/1/2, default 0):
Choose option 0 if your firmware does not use FOTA feature (updates over Wi-Fi). Use options 1/2 for firmware with FOTA enabled.
- STEP 3: choose spi speed(0=20MHz, 1=26.7MHz, 2=40MHz, 3=80MHz)
enter (0/1/2/3, default 2):
Use the appropriate SPI flash chip access speed that suits your flash memory. It is recommended to use 40MHz or lower for best compatibility.
- STEP 4: choose spi mode(0=QIO, 1=QOUT, 2=DIO, 3=DOUT)
enter (0/1/2/3, default 0):
Type of flash chip and how it is connected to the ESP8266. This would be QIO for standard modules like the ESP-01 or ESP-12 series.
- STEP 5: choose spi size and map
0= 512KB( 256KB+ 256KB)
2=1024KB( 512KB+ 512KB)
3=2048KB( 512KB+ 512KB)
4=4096KB( 512KB+ 512KB)
5=2048KB(1024KB+1024KB)
6=4096KB(1024KB+1024KB)
enter (0/2/3/4/5/6, default 0):
This is relevant only for FOTA firmware that uses user1.bin and user2.bin.
As an example, a set of working configurations for the ESP-12E or ESP-12F module would be as follows for non-FOTA applications:
Step 1: new
Step 2: option 0
Step 3: option 2
Step 4: option 0
Step 5: option 4
#---------------------------------------------
project_template File structure
The template creates four files/directories:
user/main.cmain source file with program entry point. Start writing your code hereuser/user_config.huser defined configuration header, empty by default. SDK header files rely on the existence of this file, so don't delete it even if you don't use itdriver/empty directory to place code for drivers. Mainly to separate external components' driver code from the main code, can be deleted if not used.Makefileputting it all neatly together. Again, this was copied from an example project and I don't take credit for it.
參考資料;
http://iot-bits.com/articles/building-examples-in-esp8266-rtos-sdk/
https://jcard0na.wordpress.com/2015/11/24/esp8266-hello-world-with-native-sdk/
http://domoticx.com/esp8266-wifi-software-software-development-kit-espressif/
http://www.nefastor.com/esp8266-freertos-introduction/
http://swutai.blogspot.tw/2014/08/rtos_15.html
- Dec 27 Wed 2017 10:26
Compile and Flash MicroPython Firmware on ESP32
(1) 建立ESP32 發展環境步驟
使用official FreeRTOS based SDK
- Download and install Ubuntu 14.04 virtual machine
- Install and configure ESP32 toolchain
- Download ESP-IDF and compile an example
- Download the program to your ESP32 dev board
(2) 建立Micropython ESP32 發展環境步驟
(2.1) Build your own firmware binary (參考https://blog.horan.hk/micropythonesp32.html)
(2.1.1)clone & Unpack xtensa-esp32-elf toolchain.
(2.1.2)clone ESP-IDF
(2.1.3)clone Micropython-ESP32
(2.2) Initial set up of MicroPython-ESP32
set up two things :
(2.2.1)Build cross compiler support
(2.2.2)A makefile to suit out environment
(2.3) Compile and install firmware
(2.4) Making it run your own code
注意: ESP-IDF version 常更新,要檢查及確定新版本
參考資料:
https://learn.adafruit.com/building-and-running-micropython-on-the-esp8266/build-firmware
http://iot-bits.com/documentation/esp32-tutorial-and-example-programs/
Micropython and ESP32 custom firmware https://medium.com/@alwint3r/compiling-micropython-for-esp32-85cc1968e424
- Dec 19 Tue 2017 12:35
Compile and Flash MicroPython Firmware on ESP8266
參考資料
https://www.digikey.com/en/maker/blogs/programming-micropython-on-the-esp8266/57abec67b5c34eb398d8fe6ae6442f46
https://www.raspberrypi.org/forums/viewtopic.php?t=191744 (port unix)
Compile and Flash MicroPython Firmware
Install Homebrew
The first thing you will need to install is a package manager called “Homebrew”. To install Homebrew open up the terminal window and copy and paste the following command:
/usr/bin/ruby -e "$(curl -fsSL https://raw.githubusercontent.com/Homebrew/install/master/install)"
Install Git
Now that we have brew package manager install you can go ahead and install git if it is not installed already by typing the following command in the terminal window:
brew install git
This will then begin to install git, which is where we will download all our code from to compile the firmware such as the ESP SDK and the MicroPython files.
Installing the ESP SDK
If you do not wish to install and compile the MicroPython firmware then you can download an already built firmware file from www.micropython.org/downloads .

To build the MicroPython firmware for the ESP8266 you will first need to build the ESP SDK toolchain that can actually do the compilation on your computer.
You will also need to install the following dependencies if not already installed:
brew tap homebrew/dupes
brew install binutils coreutils automake wget gawk libtool gperf gnu-sed --with-default-names grep
export PATH="/usr/local/opt/gnu-sed/libexec/gnubin:$PATH"
In addition to the development tools MacOS needs a case-sensitive filesystem. You might need to create a virtual disk and build esp-open-sdk on it:
sudo hdiutil create ~/Documents/case-sensitive.dmg -volname "case-sensitive" -size 10g -fs "Case-sensitive HFS+"
sudo hdiutil mount ~/Documents/case-sensitive.dmg
Navigate to where you downloaded the ESP SDK by typing the following in the terminal:
cd /Volumes/case-sensitive
In Mac OS or Linux you need to open up a terminal window to issue a git command, make sure you are in the directory where you want to download the files. Run the following command to clone the repository:
cd /Desktop/
git clone https://github.com/pfalcon/esp-open-sdk.git
This will now download and install the ESP open SDK repository to your desktop on your computer.
To build the tool-chain and SDK type the following:
cd esp-open-sdk
make
In order for us to use the tool-chain, you must also create a path so the MicroPython compiler can find it:
export PATH=/Volumes/case-sensitive/esp-open-sdk/xtensa-lx106-elf/bin:$PATH
Install MicroPython
To install MicroPython you must first compile the firmware to flash on to your ESP device. Make sure you are in a directory where you want to download the files to and download the following git repository:
git clone https://github.com/micropython/micropython.git
Add the external dependencies to the MicroPython repository checkout:
git submodule update --init
The MicroPython cross-compiler must be built to pre-compile some of the built-in scripts to bytecode. This can be done by using:
make –C mpy-cross
Then, to build MicroPython for the ESP8266, just run:
cd esp8266
make axtls
make
This will produce binary images in the build/ subdirectory.
Flashing the Firmware
If you install MicroPython to your module for the first time, or after installing any other firmware, you should erase flash completely:
esptool.py --port =/dev/cu.usbserial-AI032CSO erase_flash
Erase flash also as a troubleshooting measure, if a module doesn't behave as expected.
To flash MicroPython image to your ESP8266 you will also need to create a path to the esptool, which was included in the ESP SDK we install previously:
export PATH=/Volumes/case-sensitive/esp-open-sdk/esptool:$PATH
Now run the following to flash the MicroPython firmware to the ESP8266 module, making sure that it is in Bootloader mode:
make PORT=/dev/cu.usbserial-AI032CSO deploy
Connecting to the ESP8266 module
Now everything has been setup on the ESP8266 board you can now go ahead and connect to it usingr Putty(Windows)

Programming in MicroPython
- Dec 19 Tue 2017 08:54
如何安裝 ESP-IDF-ESP32 開發環境& Hello World
記錄如何安裝 ESP-IDF 開發環境
ESP 應用程式開發之元件
- PC loaded with either Windows, Linux or Mac operating system
- Toolchain to build the Application for ESP32
- ESP-IDF that essentially contains API for ESP32 and scripts to operate the Toolchain
- A text editor to write programs (Projects) in C, e.g. Eclipse
- ESP32 board itself
ESP 應用程式開發之環境準備
- 1. Setup of Toolchain
- 2. Getting of ESP-IDF from GitHub
- 3. Installation and configuration of Eclipse
You may skip the last step, if you prefer to use different editor
ESP 應用程式開發之步驟
- 1. Configuration of a Project and writing the code
- 2. Compilation of the Project and linking it to build an Application
- 3. Flashing (uploading) of the Application to ESP32
- 4. Monitoring / debugging of the Application
實例
- Download and Install VirtualBox 5.2 & Ubuntu 16.04 (參考http://blog.xuite.net/yh96301/blog/432341564)
- Setup Toolchain
- Verify Toolchain Installation
- Download ESP32 ESP-IDF from GitHub
- Compile Blinking LED Example
#---------------------------
ESP-IDF 有二種方式可以得到,一種是從source file 得到,一種是從bin檔得到,我們使用第二種方式安裝,
需要第一種方式使用者請自行參考 Compile the toolchain from source using crosstool-NG。
第二種方式如下:
Set up of Toolchain for Linux
Step 0: Prerequisites
Install some packages
To compile with ESP-IDF you need to get the following packages:
Ubuntu and Debian:
sudo apt-get install git wget make libncurses-dev flex bison gperf python python-serial
Step 1: Download binary toolchain for the ESP32
ESP32 toolchain for Linux is available for download from Espressif website:
for 64-bit Linux:
https://dl.espressif.com/dl/xtensa-esp32-elf-linux64-1.22.0-61-gab8375a-5.2.0.tar.gz
Download this file, then extract it to the location you prefer, for example:
    mkdir -p ~/esp
    cd ~/esp
    tar -xzf ~/Downloads/xtensa-esp32-elf-linux64-1.22.0-61-gab8375a-5.2.0.tar.gz
The toolchain will be extracted into ~/esp/xtensa-esp32-elf/ directory.
update yourPATHenvironment variable to~/.profilefile. export PATH=$PATH:$HOME/esp/xtensa-esp32-elf/bin
Step 2: Getting ESP-IDF from github
Open terminal, navigate to the directory you want to clone ESP-IDF and clone it using git clone command:
    cd ~/esp
    git clone --recursive https://github.com/espressif/esp-idf.git
ESP-IDF will be downloaded into ~/esp/esp-idf.
Note the --recursive option! If you have already cloned ESP-IDF without this option, run another command to get all the submodules:
    cd ~/esp/esp-idf
    git submodule update --init
Step 3: Starting a project
ESP-IDF by itself does not build a binary to run on the ESP32. The binary “app” comes from a project in a different directory. Multiple projects can share the same ESP-IDF directory.
The easiest way to start a project is to download the template project from GitHub:
    cd ~/esp
    git clone https://github.com/espressif/esp-idf-template.git myapp
This will download esp-idf-template project into ~/esp/myapp directory.
Step 4: Building and flashing the application
Now you are ready to prepare your application for ESP32. To start off quickly, we will use get-started/hello_world project from examples directory in IDF.Copy get-started/hello_world to ~/esp directory:
    cd ~/esp
    cp -r $IDF_PATH/examples/get-started/hello_world .
Connect
You are almost there. To be able to proceed further, connect ESP32 board to PC, check under what serial port the board is visible and verify if serial communication works. If you are not sure how to do it, check instructions in section Establish Serial Connection with ESP32. Note the port number, as it will be required in the next step.
Configure
Being in terminal window, go to directory of hello_world application by typing cd ~/esp/hello_world. Then start project configuration utility menuconfig:
    cd ~/esp/hello_world
    make menuconfig
If previous steps have been done correctly, the following menu will be displayed:

Project configuration - Home window
In the menu, navigate to Serial flasher config > Default serial port to configure the serial port, where project will be loaded to. Confirm selection by pressing enter, save configuration by selecting < Save > and then exit application by selecting < Exit >.
Step 5: Build and Flash
Now you can build and flash the application. Run:
make flash
This will compile the application and all the ESP-IDF components, generate bootloader, partition table, and application binaries, and flash these binaries to your ESP32 board.
esptool.py v2.0-beta2
Flashing binaries to serial port /dev/ttyUSB0 (app at offset 0x10000)...
esptool.py v2.0-beta2
Connecting........___
Uploading stub...
Running stub...
Stub running...
Changing baud rate to 921600
Changed.
Attaching SPI flash...
Configuring flash size...
Auto-detected Flash size: 4MB
Flash params set to 0x0220
Compressed 11616 bytes to 6695...
Wrote 11616 bytes (6695 compressed) at 0x00001000 in 0.1 seconds (effective 920.5 kbit/s)...
Hash of data verified.
Compressed 408096 bytes to 171625...
Wrote 408096 bytes (171625 compressed) at 0x00010000 in 3.9 seconds (effective 847.3 kbit/s)...
Hash of data verified.
Compressed 3072 bytes to 82...
Wrote 3072 bytes (82 compressed) at 0x00008000 in 0.0 seconds (effective 8297.4 kbit/s)...
Hash of data verified.

Leaving...
Hard resetting...
If there are no issues, at the end of build process, you should see messages describing progress of loading process. Finally, the end module will be reset and “hello_world” application will start.
If you’d like to use the Eclipse IDE instead of running make, check out the Eclipse guide.
Step 6: Monitor
To see if “hello_world” application is indeed running, type make monitor. This command is launching IDF Monitor application:
$ make monitor
MONITOR
--- idf_monitor on /dev/ttyUSB0 115200 ---
--- Quit: Ctrl+] | Menu: Ctrl+T | Help: Ctrl+T followed by Ctrl+H ---
ets Jun  8 2016 00:22:57

rst:0x1 (POWERON_RESET),boot:0x13 (SPI_FAST_FLASH_BOOT)
ets Jun  8 2016 00:22:57
...
Several lines below, after start up and diagnostic log, you should see “Hello world!” printed out by the application.
...
Hello world!
Restarting in 10 seconds...
I (211) cpu_start: Starting scheduler on APP CPU.
Restarting in 9 seconds...
Restarting in 8 seconds...
Restarting in 7 seconds...
To exit monitor use shortcut Ctrl+].
To execute make flash and make monitor in one shoot type make flash monitor
#------END ----------------------------------------- ESP32 – IDF Programming Getting Started
Hello World
Esp-IDF useses FreeRTOS as an operating system. If we want to work in esp-idf, we should have knowledge on How to write a program using FreeRTOS’s API. For FreeRTOS, I will give some separate tutorial later. Whenever i’m using some FreeRTOS API that time itself i will explain that API. So don’t worry guys. If you want to learn basic concepts of RTOS Part 1 please click Here. For RTOS Part 2 please click Here.
Now we are going to see the first example “hello world”. Hello world is the first program for programming, who wants to learn any programming language. So we are also going to see that.
Before that, we have to look in ESP directory. So the directory contains below Sub directory.
+–esp-idf
|
+ – – components
|
+ – – docs
|
+ – – examples
|
+ – – make
|
+ – – tools
The components directory holds all the ‘C’ code for the ESP32. It contains all the‘components’ that make up the ESP32.
It includes Drivers for numerous peripherals, the bootloader, BT (bluetooth), freeRTOS etc.
#include <stdio.h>
#include "freertos/FreeRTOS.h"
#include "freertos/task.h"
#include "esp_system.h"
void app_main()
{
printf("Hello world....\n");
vTaskDelay(1000 / portTICK_PERIOD_MS);
for(int i = 10; i>0; i--) {
printf("Module restarts in %d seconds...\n", i);
vTaskDelay(1000 / portTICK_PERIOD_MS);
}
printf("Restarting....\n");
fflush(stdout);
esp_restart();
}
freertos/FreeRTOS.h : Inclusion of this sets configuration required to run freeRTOS on ESP32.
freertos/task.h: This file includes task related things such as multitasking, task creating, deleting.
esp_system.h: This inclusion configures the peripherals in the ESP system. Think of it as system initialization.
esp_restart():
This function restart the esp. So again app_main will prints. Its like while(1).
MULTITASK : LED BLINKING WITH HELLO WORLD
It is a RTOS. So we can create multiple tasks. Using that method, i am going to create the two tasks.
- LED task (It will blink the LED)
- Hello world task (It prints in serial console)
Before that, FreeRTOS has many API. Here we are going to use API for Task creating.
#include <stdio.h>
#include "freertos/FreeRTOS.h"
#include "freertos/task.h"
#include "driver/gpio.h"
#include "sdkconfig.h"
#define BLINK_GPIO 13
void blink_task(void *pvParameter)
{
gpio_pad_select_gpio(BLINK_GPIO); /* Set the GPIO as a push/pull output */
gpio_set_direction(BLINK_GPIO, GPIO_MODE_OUTPUT);
while(1) {
gpio_set_level(BLINK_GPIO, 0); /* Blink off (output low) */
vTaskDelay(1000 / portTICK_PERIOD_MS);
gpio_set_level(BLINK_GPIO, 1); /* Blink on (output high) */
vTaskDelay(1000 / portTICK_PERIOD_MS);
}
}
void print_task(void *pvParameter)
{
while(1) {
printf("Hello world.... Welcome to www.embetronicx.com\n");
vTaskDelay(1000 / portTICK_PERIOD_MS);
}
}
void app_main()
{
xTaskCreate(&blink_task, "blink_task", 512, NULL, 5, NULL);
xTaskCreate(&print_task, "print_task", 2048, NULL, 5, NULL);
}
xTaskCreate() API:
This FreeRTOS API is used to create a task. Using this API we can create more number of tasks.
portBASE_TYPE xTaskCreate ( pdTASK_CODE pvTaskCode,
const signed portCHAR * const pcName,
unsigned portSHORT usStackDepth,
void *pvParameters,
unsigned portBASE_TYPE uxPriority,
xTaskHandle *pxCreatedTask );
- pvTaskCode: a pointer to the function where the task is implemented. (Address of the fuction)
- pcName: given name to the task. This is useless to FreeRTOS but is intented to debugging purpose only.
- usStackDepth: length of the stack for this task in words. The actual size of the stack depends on the micro controller.
- pvParameters: a pointer to arguments given to the task.
- uxPriority: priority given to the task, a number between 0 and MAX_PRIORITIES – 1.
- pxCreatedTask: a pointer to an identifier that allows to handle the task. If the task does not have to be handled in the future, this can be leaved NULL.
ESP32 IDF: Setting a soft AP
|
1
2
3
4
5
6
7
8
9
10
11
12
13
14
15
16
17
18
19
20
21
22
23
24
25
26
27
28
29
30
31
|
#include "esp_wifi.h"#define SSID "ESP32AP"void app_main(){ wifi_init_config_t wifiInitializationConfig = WIFI_INIT_CONFIG_DEFAULT(); esp_wifi_init(&wifiInitializationConfig); esp_wifi_set_storage(WIFI_STORAGE_RAM); esp_wifi_set_mode(WIFI_MODE_AP); wifi_config_t ap_config = { .ap = { .ssid = SSID, .channel = 0, .authmode = WIFI_AUTH_OPEN, .ssid_hidden = 0, .max_connection = 1, .beacon_interval = 100 } }; esp_wifi_set_config(WIFI_IF_AP, &ap_config); esp_wifi_start();} |
- Nov 29 Wed 2017 15:02
ESP32 硬體規格特性及轉接板接脚
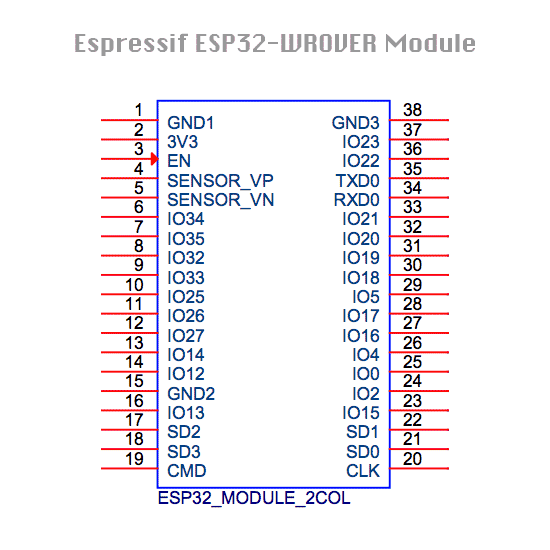
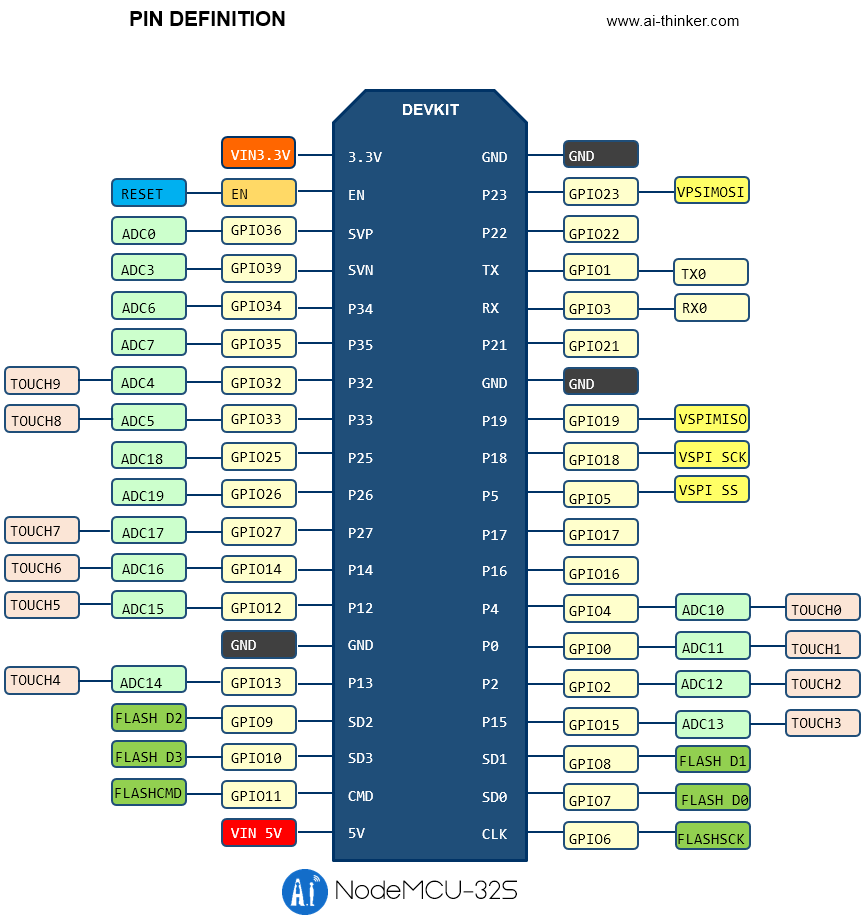
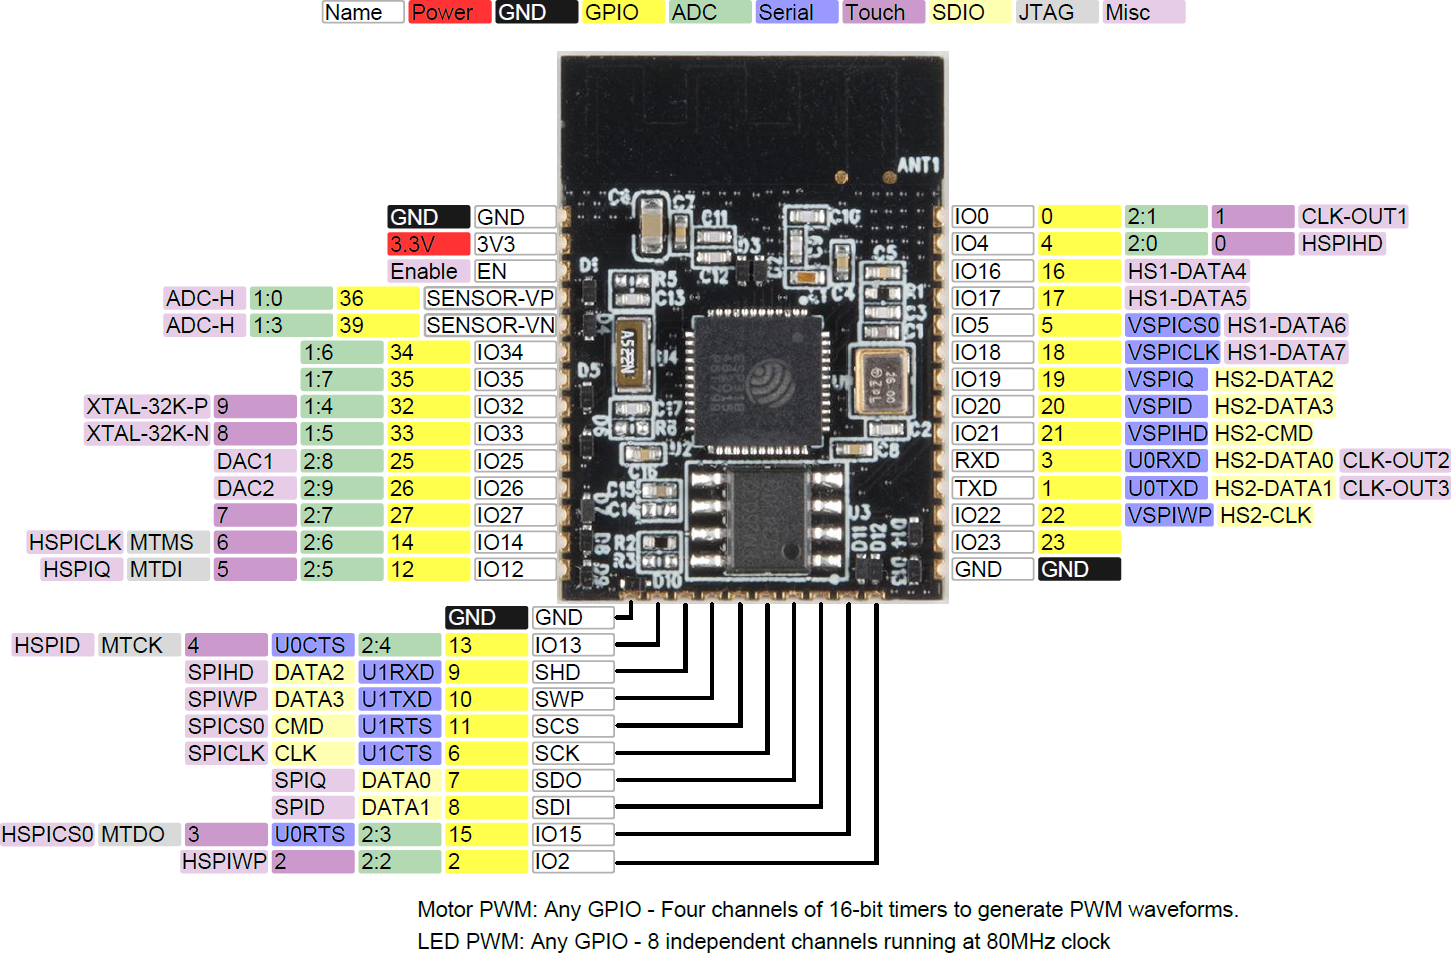

ESP32 Wrrom 接脚參考圖


注意: (1) GPIO34-39 僅能做輸入模式,無法做輸出模式。
(2) GPIO6-11 預計連外部flash好像無法做PIN IN/OUT mode。
(3) GPIO1,3 做UART 使用。
(4) GPIO0 Boot/flashing mode 使用。
(5) GPIO 2,4,5,12,13,14,15,16,17,18,19,21,22,23,25,26,27 總計有17個接脚可用。
附:比較ESP8266 接脚數:
ESP8266 的 GPIO 埠有 16+1 個 (1 是指 ADC 輸入), 但因為 IC 接腳有限, 因此腳位大多作多工用途 (一腳多用), 例如 GPIO 1 被用作 REPL UART TX; GPIO 3 是 REPL UART RX, GPIO 16 被用來將晶片從深度睡眠中叫醒, 這三支腳不能做一般 IO 用, 而 GPIO 6~11 是用來連接 Flash 晶片等 SPI 介面, 也不能使用,
因此可用的 GPIO 埠只有 0, 2, 4, 5, 12, 13, 14, 15 共 8 個:
CPU
Xtensa® 32-bit LX6 單/雙核處理器,運算能力高達 600 DMIPS
448 KB ROM
520 KB SRAM
RTC 中 16 KB SRAM
QSPI 最多可連接 4 個 Flash / SRAM,每個 Flash 最大為 16 MB
供電電壓:2.2V 到 3.6V
工作電流:平均:80 mA
封裝尺寸:18 mm x 25.5 mm x 2.8 mm
溫度範圍:-40°C ~ +85°C *
時鐘和計時器
內置 8 MHz 振盪器,支持自校準
內置 RC 振盪器,支持自校準
支持外置 2 MHz 至 40 MHz 的晶振
支持外置 32 kHz 晶振,用於 RTC,支持自校準
2 個計時器群組,每組包括 2 個 64-bit 通用計時器和 1 個主系統看門狗
具有次秒級精度的 RTC 計時器
RTC 看門狗
外設介面
12-bit SAR ADC,多達 18 個通道
2 個 8-bit D/A 轉換器
10 個觸摸感測器
溫度感測器
4 個 SPI
2 個 I2S
2 個 I2C
3 個 UART
1 個 Host SD / eMMC / SDIO
1 個 Slave SDIO / SPI
帶有專用 DMA 的乙太網 MAC 介面,支援 IEEE 1588
CAN 2.0
IR(TX / RX)
電機 PWM
LED PWM,多達 16 個通道
霍爾感測器
超低雜訊前置模擬放大器
Wi-Fi
標準:FCC/CE/IC/TELEC/KCC/SRRC/NCC
協議:802.11 b/g/n/d/e/i/k/r(802.11n,速度高達 150 Mbps)
A-PDU 和 A-MSDU 聚合,支持 0.4 μs 防護間隔
頻率範圍:2.4 ~ 2.5 GHz
Wi-Fi 模式: Station/softAP/SoftAP+station/P2P
安全機制:WPA/WPA2/WPA2-Enterprise/WPS
加密類型:AES/RSA/ECC/SHA
藍牙
協議:符合藍牙 v4.2 BR/EDR 和 BLE 標準
射頻:具有 -98 dBm 靈敏度的 NZIF 接收器
Class-1, Class-2 和 Class-3 發射器
AFH
- Nov 22 Wed 2017 16:00
Arduino ESP32 Example
http://www.iotsharing.com/2017/07/how-to-use-ble-in-arduino-esp32.html
http://www.iotsharing.com/
Introduction to ESP32
Demo 1: Blinky - a Hello World on Arduino ESP32
Demo 2: How to use multiple Serial port on Arduino ESP32
Demo 3: How to use Arduino ESP32 to read temperature/humidity from DHT11/DHT22
Demo 4: How to use Arduino ESP32 to display information on I2C LCD
Demo 5: How to use Arduino ESP32 to display information on SPI LED matrix
Demo 6: How to use Arduino ESP32 to display information on OLED
Demo 7: How to use Arduino ESP32 to store data to sdcard
Demo 8: How to use TCP/IP with Arduino ESP32
Demo 9: How to use mDNS to resolve host names to Arduino ESP32 IP addresses
Demo 10: How to turn the Arduino ESP32 into an Access Point
Demo 11: How to use SmartConfig on Arduino ESP32
Demo 12: How to turn the Arduino ESP32 into a Web Server
Demo 13: How to display temperature/humidity using Google Chart/Jquery and control LED through Arduino ESP32 Web Server
Demo 14: How to use MQTT and Arduino ESP32 to build a simple Smart home system
Demo 15: How to build a system to update Price Tag automatically using Arduino ESP32
Demo 16: How to update firmware OTA for a batch of Arduino ESP32
Why Finite State Machine (FSM) is important to Arduino ESP32
Demo 17: Arduino ESP32/ESP8266 WebGPIO - control GPIO from web
Arduino ESP32 FreeRTOS 1: How to create a task
Demo 19: How to use UDP/IP with Arduino ESP32
Demo 20: How to control a Servo via Arduino ESP32 Web Server
Demo 21: How to use interrupt in Arduino ESP32
How to get the IP address of a node by its mdns host name in Arduino ESP32
Demo 22: How to use Timer interrupt in Arduino ESP32
Demo 23: How to use Preferences to backup Arduino ESP32 data in main flash memory when power is off
Demo 24: How to bring ESP32 to low power-sleep mode to extend battery life
Demo 25: How to configure ESP32 Dual core - Multicore in Arduino ESP32
Demo 26: How to use Arduino ESP32 I2S to play wav music file from sdcard
Demo 27: How to use Arduino ESP32 BLE (Bluetooth Low Energy) as a GATT server
Demo 28: How to use Arduino ESP32 BLE (Bluetooth Low Energy) as a GATT client
Demo 29: How to use HTTPS in Arduino ESP32
Demo 30: How to use ESP32 MQTTS with MQTTS Mosquitto broker (TLS/SSL)
Demo 31: How to use Arduino ESP32 CAN interface
Demo 32: Simple Machine Learning - Artificial neural network demo using Arduino ESP32
Demo 34: firmware update OTA for ESP32 using HTTP and sdcard
- Jul 25 Tue 2017 10:43
ESP8266 HTTP SERVER
WiFi library
ESP8266 Tutorial Part I – Getting Started
ESP8266 Tutorial Part II – ESP8266 Hello Web Server with Arduino IDE
ESP8266 Tutorial Part III – Customise Your Web Server with Arduino
- Jul 14 Fri 2017 11:43
ESP8266 省節模式
How to Run Your ESP8266 for Years on a Battery
- Jul 12 Wed 2017 11:10
Micropython中斷處理
2017.07.12
要寫出比較複雜或功能性的程式,總是要多著墨一下在處理器的中斷處理機制,除非你的程式很簡單只是單一程式或只做簡單地LED控制,那可以不用學習中斷處理機制,否則你會發現中斷處理能幫忙你解決很多程式碼。
Interrupt handlers(中斷處理) - 也被做中斷服務常式(ISR)或定義成callback functions。它們的概念是當某一事件發生時去做一些事,這些事件可能是計時器觸發或某個pin脚位電壓改變。這些事件也可能發生在程式執行時的任何點。
中斷處理程式碼撰寫技巧
- (1)中斷服務常式盡可能短及簡單。
- (2)中斷服務常式內不能使用記憶體分配的功能。
- (3)中斷服務常式需要返回多個bytes值時,使用事先分配好的bytearray資料型態傳送,如在主程式及中斷服務常式要分享多個整數值時使用array資料型態傳送。
- (4)主程式及中斷服務常式要存取資料時,優先考慮先在主程式中先暫停中斷功能,存取資料後再恢復中斷(也就是臨界區段的處理方式(Critical section),它是指一個存取共用資源(例如:共用裝置或是共用記憶體)的程式片段,而這些共用資源有無法同時被多個執行緒存取的特性)。
- (5)中斷服務常式要分配一個emergency exception buffer去處理ISR中的錯誤。例如
import micropython
micropython.alloc_emergency_exception_buf(100)
中斷處理程式範例
def callback(p):
     print('pin change', p)

下面設定兩個pin脚為輸入
from machine import Pin
p0 = Pin(0, Pin.IN)
p2 = Pin(2, Pin.IN)
下面設定兩個pin脚何時被觸發
p0.irq(trigger=Pin.IRQ_FALLING, handler=callback)
p2.irq(trigger=Pin.IRQ_RISING | Pin.IRQ_FALLING, handler=callback)
接脚0被觸發當接脚0的電位從高電位變為低電位時啓動 callback
接脚2被觸發當接脚2的電位從高電位變為低電位時或從低電位變為高電位時啓動 callback
#------------------------
下面為時間器物件的中斷服務常式範例
每一個計時器由記數器組,而計數器以固定的頻率做計數(通常以HZ為單位)。當計數器計數到設定的時間時即觸發一個事件,而我們設定事件使用callback的方式就可以呼叫我們定義的函數。
資料來源: http://docs.micropython.org/en/latest/wipy/wipy/tutorial/timer.html
#----------------------
Example1: 使用固定頻率觸發一個LED
from machine import Timer
from machine import Pin
led = Pin('GP16', mode=Pin.OUT)                  # enable GP16 as output to drive the LED
tim = Timer(3)                                   # create a timer object using timer 3
tim.init(mode=Timer.PERIODIC)                    # initialize it in periodic mode
tim_ch = tim.channel(Timer.A, freq=5)            # configure channel A at a frequency of 5Hz
tim_ch.irq(handler=lambda t:led.toggle(), trigger=Timer.TIMEOUT)        # toggle a LED on every cycle of the timer
Example using named function for the callback:
from machine import Timer
from machine import Pin
tim = Timer(1, mode=Timer.PERIODIC, width=32)
tim_a = tim.channel(Timer.A | Timer.B, freq=1)   # 1 Hz frequency requires a 32 bit timer

led = Pin('GP16', mode=Pin.OUT) # enable GP16 as output to drive the LED

def tick(timer):                # we will receive the timer object when being called
    global led
    led.toggle()                # toggle the LED

tim_a.irq(handler=tick, trigger=Timer.TIMEOUT)         # create the interrupt
Further examples:
from machine import Timer
tim1 = Timer(1, mode=Timer.ONE_SHOT)                               # initialize it in one shot mode
tim2 = Timer(2, mode=Timer.PWM)                                    # initialize it in PWM mode
tim1_ch = tim1.channel(Timer.A, freq=10, polarity=Timer.POSITIVE)  # start the event counter with a frequency of 10Hz and triggered by positive edges
tim2_ch = tim2.channel(Timer.B, freq=10000, duty_cycle=5000)       # start the PWM on channel B with a 50% duty cycle
tim2_ch.freq(20)                                                   # set the frequency (can also get)
tim2_ch.duty_cycle(3010)                                           # set the duty cycle to 30.1% (can also get)
tim2_ch.duty_cycle(3020, Timer.NEGATIVE)                           # set the duty cycle to 30.2% and change the polarity to negative
tim2_ch.period(2000000)
#----------------------
Example3: ESP32 MicroPython: External interrupts
import machineinterruptCounter = 0totalInterruptsCounter = 0def callback(pin): global interruptCounter interruptCounter = interruptCounter+1p25 = machine.Pin(25, machine.Pin.IN, machine.Pin.PULL_UP)p25.irq(trigger=machine.Pin.IRQ_FALLING, handler=callback) # interrupt should be triggered when a falling edge is detected in the input signal connected to the pin. while True: if interruptCounter>0: state = machine.disable_irq() interruptCounter = interruptCounter-1 machine.enable_irq(state) totalInterruptsCounter = totalInterruptsCounter+1 print("Interrupt has occurred:" + str(totalInterruptsCounter))
註: GPIO 輸入腳最好用 2K~10K 上拉電阻接至 3.3V (使用 2K 對雜訊抑制力較佳), 不過 GPIO 腳內部都有內建上拉電阻, 可以透過軟體設定開啟
#-----偵測RSSI值的MicroPython程式-------
import network
from machine import Timer
wlan = network.WLAN(network.STA_IF)
def connectAP(ssid, pwd):
if not wlan.isconnected():
wlan.active(True)
wlan.connect(ssid, pwd)
while not wlan.isconnected():
pass
print('network config:', wlan.ifconfig())
connectAP("無線網路AP名稱", "無線網路密碼")
# 每2秒顯示信號強度
tim = Timer(-1)
tim.init(period=2000, mode=Timer.PERIODIC,
callback=lambda t:print('RSSI:', wlan.status('rssi')))
try:
while True:
pass
except:
tim.deinit()
print('bye!')
參考資料: MicroPython: Interrupts with ESP32 and ESP8266
偵測ESP8266的Wi-Fi RSSI(接收信號強度)的Arduino和MicroPython程式
- Jul 10 Mon 2017 10:07
ESP8266 記憶體分配及管理
2017.07.10 星期一
在研究或使用MCU時很多文章都會談論到記憶體管理機制,但我找了很多資料,發現為什麼ESP8266的使用者或文章很少提到ES8266內部的記憶體使用結構,可能大家都偏重在應用面很多少會去管系統面的東西,反正程式可以執行,結果正確就好,何必去管它記憶體如何分配,程式如何消耗。或許這不是一個很值得研究的議題,但我是資工背景所以個人卻對這塊黑盒子有點興趣及好奇,所以做些研究記錄。至於各位看倌有没有興趣,我是不知道,但說不定這篇文章可以幫助我們對ESP8266的操控能有些了解。
要探討記憶體的使用,我們總要複習一下記憶體位址的表示方式
假如
ESP8266的記憶體體內量為512K Bytes=4194304 bits 則可用的記憶體範圍利使用16進示則從0x000000~0x3FFFFF。
ESP8266的記憶體體內量為1M Bytes= 8388608 bits 則可用的記憶體範圍利使用16進示則從0x000000~0x7FFFFF。
ESP8266的記憶體體內量為4M Bytes= 33554432 bits 則可用的記憶體範圍利使用16進示則從0x000000~0x1FFFFFF。
ESP8266的記憶體體內量為8M Bytes= 67108864 bits 則可用的記憶體範圍利使用16進示則從0x000000~0x3FFFFFF。
所以假如我們買的是ESP-12E或F有4MBytes的記憶體空間,則在進行燒錄作業時要指定作業系統及程式要放在什麼區域。例如我們作業系統通常會從0x000000開始存放,而當晶片開機或Reset時,晶片則從記憶區0x000000開始載入作業系統程式直到控制權移轉給使用者為止。
一個ESP8266應用程式是由二部份映像檔組成,而這二個檔案是被儲存在flash memory內,第一部份位址儲存在0x0000且內容包括boot code(指令RAM碼,RAM資料),而這個檔案最大為64KB。而第二部份包含ROM code(指令ROM碼及唯讀資料),這二個部份最大的不同在於第一個映像檔在開機期間會從flash 放入晶片內的RAM,而在第二部份內的常式會在需要時才從第二個映像檔載入至RAM指令區的快取記憶體內或直接到flash memory讀取唯讀資料。
因為不同的firmware有不同的記憶體規劃方式,底下為一個ESP8266 Memory Map for 512K Flash Chip 的例子,
| 位址 | 大小 | 描述 |
|
0x000000
|
0x010000 (64K) |
Application boot image
|
|
0x010000
|
0x001000 (4K) |
Basic Persistent memory
|
|
0x011000
|
0x06b000 (428K) |
Application ROM code/data
|
|
0x07c000
|
0x004000 (16K) |
ESP8266 system parameters
|
雖然大部份ESP8266晶片最都有512KB的flash memory ,但是其他大容量的晶片例如1MB, 2MB, 4MB or 8MB都有類似的記憶體架構,而前面三個區域的位址是固定的,只有第四個區域大小會晶片容量不同而不同。另外Basic Persistent memory和ESP8266 system parameters 可以被應用程式使用。而Application ROM code/data的其他空的區域可以任意被使用,例如SPIFFS (SPI Flash File System)。
我們再回顧且對應一下規格書上所寫的文件。
- Architecture: Xtensa lx106
- CPU frequency: 80MHz overclockable to 160MHz
- Total RAM available: 96KB (part of it reserved for system)
- BootROM: 64KB
- Internal FlashROM: None
- External FlashROM: code and data, via SPI Flash. Normal sizes 512KB-4MB.
- GPIO: 16 + 1 (GPIOs are multiplexed with other functions, including external FlashROM, UART, deep sleep wake-up, etc.)
- UART: One RX/TX UART (no hardware handshaking), one TX-only UART.
- SPI: 2 SPI interfaces (one used for FlashROM).
- I2C: No native external I2C (bitbang implementation available on any pins).
- I2S: 1.
- Programming: using BootROM bootloader from UART. Due to external FlashROM and always-available BootROM bootloader, ESP8266 is not brickable.
參考資料
https://www.zbasic.net/doc/ZBasicESP8266/ZBasicESP826661.html
- Jul 07 Fri 2017 21:34
ESP8266 目錄
- Jul 07 Fri 2017 15:47
ESP8266 應用範例
Programming ESP8266 Using Arduino IDE
Connecting ESP8266 With Raspberry PI Using Python
ESP8266 WiFi Module for Dummies
DIY WIFI RC Car With ESP8266 and Arduino IDE
How to Build a ESP8266 Web Server
WIFI Battery Monitor System - ESP8266
Easy ESP8266 WiFi Debugging With Python
ESP8266 & IFTTT Autobot Notification System
Programming the ESP8266-12E Using Arduino Software/IDE
Configure STA_IF interface of ESP8266 (MycroPython firmware) to connect with WIFI network automatically on boot
- Apr 10 Mon 2017 09:45
ESDP8266 編輯器
2017.04.10 星期一
這篇文章介紹一些可以開發ESDP8266的編輯器,目前個人偏好使用MicroPython使用開發ESP8266程,因此這些軟體是可以編寫MicroPython為主,但通常可以編寫MicroPython的軟體通常是可以編寫LUA語法的。目前收集到免費軟體有三種,分別為ESPlorer,ESPyHarp,ESPCut。但是很遺憾地到目前為止(2017,04,10)個人測試及網友的留言皆表示軟體ESPlorer在Micropython的檔案上傳及編輯功能仍然有問題。ESPyHarp個人使用經驗是之前編輯過的檔案會消失,無法再開啓舊檔案。有點令人失望。ESPCut正在試用中。
(1) ESPlorer
今天發現了用Java所撰寫,可以在Windows執行ESP8266開發環境的ESPlorer軟體,這是一個類似Arduino IDE開發環境的軟體,但是Arduino IDE有支援NodeMCU的開發,但没有支援MicroPython的開發環境。ESPlorer軟體可以同時支援NodeMCU和MicroPython的開發環境。因為小編個人偏愛使用Python去控制ESP8266,所以希望使用MicroPython程式語言的環境,安裝軟體且搜尋軟體的使用方法時,發現有關ESPlorer軟體教學真是少之不少,且官網竟然無ESPlorer支援開發MicroPython的文件資料,真讓人驚訝,所以搜尋一些文章且做一些教學記錄。其實二種程式誩言(MicroPython 及NodeMCU)在ESPlorer開發環境中只差一個選項而宜,其餘的操作方式及功能都是一樣的(當然你安裝的韌體和開發使用的程式誩言是不同的),所以學會一種後自然而然可以運用到一個誩言。
首先
1. 下載軟體 最新版 ESPlorer v0.2.0-rc6
官方網站: http://esp8266.ru/esplorer
最新版軟體下載 http://esp8266.ru/esplorer#download
2. ESPlorer軟體特點 ( 最新版ESPlorer v0.2.0-rc6 )
- Java 寫的,支援 Windows / Linux / Solaris / Mac 作業系統
- 支援 LUA 和 Python 的語法
- 程式編輯器可設置不同的主題:default, darl, Eclipse, IDEA, Visual Studio
- 程式編輯器支援 Undo / Redo 功能
- 程式碼自動完成 ( Ctrl+Space )
- 聰明的餵食資料給 ESP8266 並且確認每一條發出去的指令回覆是否正確
- 程式碼片段 ( Code snippet ) 管理功能
- 詳細的記錄 ( logging ) 功能
- 可將多個寫好的 Lua 腳本存放到 flash,讓 ESP8266 自己執行
電腦須先安裝JAVA7以上的執行環境,下載之後解開,直接執行ESPlorer.bat即可:
ESPlorer操作環境
啟動後的畫面分左右兩半,左上方編輯功能區、左中間是程式編輯區,左下方是功能按鈕區。右上方是與ESP8266通訊的連線設定區,右中間是訊息及結果顥示區域,右下方則是snippet區域。
編輯功能
- New file:開新檔案
- Open:開啟lua檔
- Save:儲存lua檔
- Line:將目前游標所在行的程式碼送到NodeMCU執行
功能按鈕
- Save&Compile:將NodeMCU上的lua檔編譯成lc檔
- Save to ESP:將lua檔儲存到NodeMCU,並執行該lua檔
- Send to ESP:將lua檔內容傳送到NodeMCU上執行,但不儲存到NodeMCU
- Run:用dofile()去執行NodeMCU上的lua檔
- Upload:將lua檔上傳到NodeMCU
畫面右方三個按鈕的作用是:
Format :將ESP8266格式化,使用者程式會全部被刪除。
FS Info:查看ESP8266的檔案狀況。
Reload :重新載入使用者程式。
在右方的選項可在[VIEW]功能項中設定
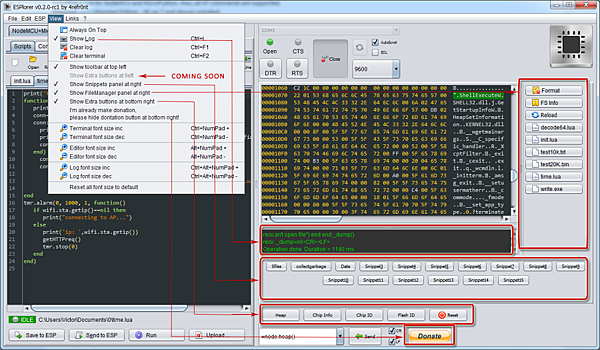
資料來源: ESPlorer — Integrated Development Environment (IDE) for ESP8266 developers
1. ESP8266通訊的連線設定
nodeMCU 預設連線的UART設定是 9600,8,N,1 ,使用 ESPlorer 的時候要設定畫面右半邊的連線區域上的 Baudrate 選項設定為 9600 ,然後指定連線設備為 "/dev/tty.usbserial" (在 Linux 系統上應該是 "/dev/ttyUSB0")
設置完按下 "Open" 按鍵就開始連線。這時如果把ESP8266重新上電的話應該會看到類似下面的訊息:
設定右上方的COM port之後,按下open按鈕就可以連線,連線後如果出現Can’t autodetect…. 錯誤訊息,先忽略不看。
2. 編輯 Lua Script 檔 & 執行 & 燒錄 Lua Script 程式
開發工具的左半邊是 Lua script 的程式碼編輯區,在此區編輯要燒入ESP8266模組的Lua script檔。要在連線的狀態之下才能燒入 Lua Script。
開發工具也支援將lua script 用檔案的形式儲存在晶片之中,之後再呼叫出來運行的方式。做法是先在編輯區之中把程式碼打好,然後按上面的 "Save" -> 指定存檔檔名(副檔名要為.lua)。最後再按下下方的 "Save to ESP" 按鈕,就會看到開發工具會用 lua 的 file open 的方式來把程式碼檔案寫入晶片之中的檔案系統,並且用剛剛存檔的檔名。之後就可以使用 lua 的 dofile("檔名") 來執行已存在晶片之中的 lua script檔。
dofile("script.lua")
開機後執行的第一個lua script檔
NodeMCU的韌體預設在晶片開機的時候,會先自動呼叫 init.lua 這個檔案來執行。 如果要有開機後執行初始化設定的需求的時候,就把初始化動作寫好之後存指定檔名為 init.lua之後,再按下 Save to ESP 按鈕。以下程式,可以讓NodeMCU開機後,LED不斷的閃爍。
然後按下編輯區下方的 "Send to ESP" 按鈕,會看到開發工具會把該行程式碼傳送給ESP後馬上執行。如果有程式碼不只一行的話會看到,傳一行執行一行,結束後才執行下一行的動作狀況。
(1) 第一步是開啓新的或編輯舊的lua檔
(2) 程式編輯完後。可以選擇Save&Run ,Save&Compile........等功能。
(3) 傳送和執行
- Save to ESP:將lua檔儲存到NodeMCU,並執行該lua檔
- Send to ESP:將lua檔內容傳送到NodeMCU上執行,但不儲存到NodeMCU
- Run:用dofile()去執行NodeMCU上的lua檔
- Upload:將lua檔上傳到NodeMCU
在畫面左方 Scripts 視窗輸入程式,然後按下下方的 Send to ESP 按鈕,即可送至 NodeMCU立即執行。Lua 語言也可以將程式模組化,然後呼叫模組來執行某些動作。
先來一行最簡單的程式:
print("Hello, world")
將上面的程式輸入到Scripts視窗,按下 Send to ESP 按鈕,就可以在右邊的終端機視窗看到如下圖的傳送過程與結果。
(2) ESPyHarp
ESPyHarp是一套由韓國人利用Java所寫的ESP8266開發軟體,同樣地也是支援MicroPython語,但個人試用的結果是之前所寫的Booy.py & Main.py 及其他儲存在晶片內的py檔,都無法再回復。
(3) ESPCut
ESPCut 是一個為ESP8266整合性的開發環境,這個軟體支援LUA及Python開發程式語言。在 ESPCut軟體內你可以燒錄新的靭體及使用拖、拉操作方式上傳及下載檔案 。支援程式語言包括了
軟體下載:
操作說明
不過這套軟體安裝完後執行seeting選項即會出現存存取記憶體錯誤的訊息,所以系統無法儲存port number 設定,因此每次軟體執行後再按disconnect,選擇正確地port number 後再重新connect。這也可能是軟體的bug所致。
總結三套軟體的功能,有二套是用Java所寫的,其功能皆是大同小異,但三套在檔案編輯上都用問題,重裝micropython後,晶片內會有boot.py,但上傳或複製檔後以前的檔案會消失無法再出現,但晶片RESET後,boot.py和main.py是會正常執行但三套軟體皆看到檔案目錄。三套軟體中比較特別的ESPCut可以直接燒錄firmware,而ESPyHarp在檔案編輯比較直接簡單,但檔案目錄出現的檔案會重複出現要常按refresh才會出現單筆的檔案。總而言之,没有一套是完美的,目前只能三套混合使用,如果有讀者知道原因還真希望有人告訴我為知上傳檔案至ESP後,整個檔案目錄會消失看不見。
- Apr 07 Fri 2017 22:22
ESP8266開發版通電測試及Hello World
2017.04.07 星期五
當在寫這篇文章時,實際上遇到一些問題一直在鬼打牆不懂到底那裡有問題,搜尋且閱閱讀很多網路文章時,發現為什麼大家都没有問題,一切都能很順利完成工作,在緊要關頭時或步驟時就没交待清楚了,或就給與一些連結請參考下面網址,然後就成功了。看了真是難受香菇,是我太笨接線有問題或是我的環境有問題或是安裝步驟有問題或是莫名原因就是不會成功。事實上技術的學習或研究是不可能不會遇到問題,也不太可能一裝就會作功的。下面我就記錄我遇到了什麼問題及如何解決問題,如此你可以少走一些路。或許我可以直接做一個結論為何每篇會有技術上的差異及結果,原因是開發環境及硬體,軟體没有一定的準則,何如(1)你的作業環境是Linux,Windowsirm或是MAC os x 系統,(2)你測試韌體AT指令時是使用putty或是使用Arduino IDE serial或是Realterm 通訊軟體,(3)而你自己偏好要安裝的韌體環又是什麼,是AT原始韌體或是RTOS、NO-OS SDK或是NodeMCU韌體、MicroPython韌體、Espruino韌體或是WF8266R韌體,(4)你是何種的燒錄軟體燒錄韌體NodeMCU Flasher、esptool、esp flasher。(5)韌體燒錄完後,使用何種開發誩言及何種IDE開發軟體發展程式,例如Arduino IDE、ESPlorer IDE、LuaLoader IDE。針對這五個項目再加上(6)硬體接線的正確性,針對以上的問題,每個使用者可以有不同的選擇也都有不同的解決方案、也有不同種類的網路文章在介紹及說明。所以目前没有一篇文章能夠講的清楚為何有問題,可能是什麼問題。並且目前ESP8266模組的官方正式技術文件太少,所以有的人可以做的出來,有的可能因為環境,軟體不同所以没辦法做的出來。(如果讀者不看懂上面的技術分類或名詞,你可能要參考我之前的文章說明。)下面我再整理出可能我會遇到的問題及結果。
(1) 硬體接線的正確性
請依上篇文章所收集的電路製作你自己的ESP8266開發板,剛買來的模組包括了ESP-12F晶片、排線、轉接板及一個小小的LM3117穩壓IC,你自己用烙鐵依電路圖小心的焊接,不過因為第一次用所以不知道LM3117穩壓IC是可以焊在轉接板上,所以該IC是浮接在半空中的,如此破壞了自製ESP8266開發板的美觀度。雖然有點醜,不過為了節省費用,只要確定接線正確,功能正常就可以了。下圖將ESP8266晶片,排線焊接在轉接板之後的轉接板前後圖。


下圖為焊接完的ES8266開發板

從上圖中可以看到這個電路包括了晶片及轉接板,一個按鈕開作Reset用,一個指二段式的替指撥開關作模式切換,除此之外還包括了一個220歐姆和一個Led接到CPIO4 當作開發板提示用。(註:這部份和上篇文章中的電路圖有些不同,上篇文章的電路圖是連接到CPIO2,原因後面再講),另外最上的部份包括了一個5PIN的排母,這部份是要連接TTL USB 模組的,當然開發板也有二個引線分別接5V的VCC及GND。
好了,再次確認線路正常後,就可以大膽送電了。有二個部份需要連接,一個是5V的電,另一個部份為USB線連接到USB to TTL (Serial) 模組。如果没發生短路或任何燒焦味就表示你的電路可能是正常的,後面我們必安裝軟體才會測試出整個線路是否可以正常運作。
(2)安裝軟體
(2.1)第一要安裝軟體的 是USB to TTL (Serial) 模組(FT232 模組)及驅動程式,在Windows作業系統不需要安裝軟體即可辦識出USB to TTL (Serial) 模組如無則要尋找、下載、安裝出你USB to TTL (Serial) 模組的驅動程式。你的電腦是否可以辦識出USB to TTL (Serial) 模組可以從電控制店的裝置管理看出
請參考下圖
USB to TTL (Serial) 模組安裝在COM4,如無安裝成功或系統無法辦識則不會有這個訊息

(2.2) 你可以使用putty或是使用Arduino IDE serial或是Realterm 通訊軟體利用AT指令去測試韌體
首先我們先開啓一個putty terminal ,而session 字串選擇COM4,傳送速率設定在15200 bits, 然後按儲存和OPEN
如下圖所示。

按OPEN後會出現一個黑白視窗,如下圖所示

此時,我們按ESP8266上的Reset鍵(別忘了模式切換按鍵放在H電位),
就會出現如下的畫面,如果出現這個訊息就表示你的開板成功了。
AT 指今測試成功就像我們在寫電腦程式中的第一個Hello World 程式,它代表著你的硬體接線及軟體安裝都是没有問題可以正常運作的。

如果你無法到達上面那個畫面,有二種可能你需要排除
(1)你的晶片內無安裝OS,通常買來的晶片廠商會內建基本的AT 指今OS,如果没有或損毀,你要到網路上去找最新版的ESP8266_NONOS_SDK
下載這些檔案如下圖所示的將這些bin檔依照位址將檔案燒錄到晶片內(別忘了你的晶片大小設定要對,如你的晶片為我所推薦的F12E,晶片大小設為8M bytes)
另外(別忘了模式切換按鍵放在L電位和按Reset鍵)。
(2)你的硬體線路接線可能有問題,要重新檢視你的線路,到目前為止我按照上圖的按法是正常没問題的
(3)另一種可能是你的晶片有問題,換一顆看看,基本上除非電源問題或有接線錯誤,不然晶片燒燬的機率不太。

到這個步驟如果一切正常,下面我們可以開發開發我的們的產品或專案了。
- Mar 28 Tue 2017 16:23
ESP8266硬體線路連接
2017,3,28 星期二
首先我們要將電腦連結至ESP8266,如此我們才可將韌體程式燒錄或撰寫我們的專案程式,但問題是兩個裝置的通訊介面不同,所以我們無法直接連結,電腦的通訊界面是USB接口,而ESP8266是利用RT/TX的序列對外通訊,因此我們要在這二個裝置接上一個轉換界面,這個轉換界面的工作即是在將USB資料轉成序列的通訊方式。這時我們有二種硬體的連接方式,一種是連結Arduino開發版到ESP8266,而另一種方式是另外外接一個USB to TTL的轉接板去完成這項工作。每一種方式都有自己的問題及要注意的事項,至於要選擇那一種方式因人而異。在搜尋網路文章時你會發現兩種接法在皆有人作,經過下面的解說後,你就會明白它們有各自的問題及優缺點。兩種方式如下:
PC(USB) <->Arduino <-> ESP8266
PC(USB) <->USB to TTL轉接板<-> ESP8266
第一種連線方式
- 電腦USB連結Arduino再連接ESP8266
PC (USB) <-> Arduino <-> ESP8266

資料來源: 便宜大碗的WiFi 晶片 ESP8266入手-與Arduino對接
如此作法的接線方式及運作確實可以簡化線路的複雜化,這種模式有時是可以成功的,有時會有問題,為什麼?
(一)最大的問題在於供電的電流問題,正如我們之前文章提到的ESP8266模組的耗電量平常是100mA,最多是200mA。
|
工作模式 |
平均值 |
峰值 |
|
持續傳送下 |
~70mA |
200mA |
|
正常型態下 |
~12mA |
200mA |
|
待機 |
<200uA |
|
Arduino Uno的官方技術規格書中寫到3.3V的輸出電源只能提供50mA 的電流(DC Current for 3.3V Pin 50 mA),所以ESP8266的平常耗電量可能要100mA有作者文章做過測試利用種方式跑測試資料,開Client模式傳資料時,整個板(USB電壓電流檢測器)最多寫吃100mA,也沒出什麼問題,所以就沒另外供電。但是作者也提到在作程式的實作會影響耗電,特別是在燒錄程式時,板子就不穩定。因此我們要從Arduino供電提供ESP8266運作可能會沒問題,但要燒錄程式時最好能提供到200mA的電流,所以最好的方式還是要另接外部電源。否則在需要高電流的情況下,可能燒毀Arduino Uno開發版。
(二)比較建議的接法是另外外接外部電源供電,建議電路圖如下:

資料來源: Arduino ESP
在上面電路圖中,Sensor1~3及Led1~3可以不用接。另外在外部電源方面也可參考下面二種的作法。
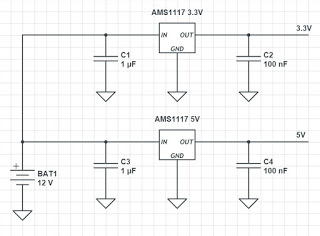

資料來源:於電源穩壓 IC 資料來源: Blink Manual Flash
AMS1117 的規格可輸出 800mA,可滿足ESP8266模組電源的需求了。
(三)另一個會遇到的問題是,如果你是用Arduino Uno,只要這樣接以後,ESP8266就佔據了Arduino的RX、TX,所以在Arduino的使用上就看不到Serial.print 的結果了。
(四)另一個有一個可能的問題是Arduino 與ESP8266通訊線的問題。在上圖中我們將Arduino的TX(傳送資料)接脚直接連接到ESP8266的RX(接收資料)接脚,但Arduino 的TX接脚輸出壓為5V,但ESP8266的RX接脚為3.3V的輸入電壓,所以如用上圖的而Arduino TX0接ESP8266 RX可能會有燒毀ESP8266的可能性,因此建議使用二個電阻(1K及2K或10K及 20K)分壓,使5.5V的輸出電壓變成3.3V的電壓,電路圖如下。

資料來源: ESP8266 Wifi With Arduino Uno and Nano
硬體及軟體需求如下
- 電腦USB
- Arduino UNO
- ESP8266 模組
- LM1117或LM317模組
- Arduino IDE 1.6.5版本以上
第二種連線方式
- ESP硬體連接方式(二) : 電腦USB連結USB To serial再連接ESP8266
PC (USB) <-> USB to TTL <-> ESP8266

資料來源: Getting Started with the ESP8266-12
電路的注意事項:
- 在電路圖中的虛線是可選擇的,是為了電路操作上的穩定性。
- GPIO0在正常操作模式下為High電位,而在燒錄模式下為Low電位,連接一個開關方便模式切換。
- 在開發及測試階段,接一個Reset開關方便Reset使用。
- 有些人主張從USB的傳送端(TX)接一個100 ohm 電阻及一個3.3V稽納二極體至ESP8266的接收端(RX),可以防止5V的電壓進入ESP8266模組,但小編個人認為可以省略這二個元作,不會造成潛在的缺點及會影响系統的穩定度及效能(可參考ESP8266電源與供電問題這篇文章)。
- 在VCC及GND之間接4.7 uF或更大的電容器,可以增加電源的穩定性,但如你的電源來源的穏定性夠,也可以忽略此元作)。
- 另接外部3.3V電源是必要的,不要使用USB to Serial 模組提供的3.3V電壓,因為該模組的輸出最大電流不能完全足夠供應ESP8266模組使用。
- ESP8266 模式設定
GPIO 0 GPIO 2 GPIO 15 UART Download Mode (Programming) 0 1 0 Flash Startup (Normal) 1 1 0 SD-Card Boot 0 0 1
原本以為上圖的電路連接己經相當實用且類似ESP8266開發板的線路,但實測上發現這個線路在正常模式運作没什麼問題,但在燒錄模式時卻無法正常的燒錄軟體,最後發現原因在GPIO2,有些文章認為這個GPIO2的脚位可以不用管它,但我在實測上發現GPIO2的脚位必須是高電位才可正常燒錄,如果你有相同的問題,請把GPIO2脚位設為電位。
硬體及軟體需求
- 電腦USB
- USB to TTL (Serial) 模組(FT232 模組)及驅動程式
- ESP8266 模組
- PUTTY 終端機連結或Arduino IDE 1.6.5版本以上
以上二種ESP8266的硬體接線方式皆有人做,但要小心了解各自的問題及優缺點,有些網路文章可能只是展示技術的可行性及簡單化操作程序並没有把問題講清楚,如果你是要開發專案或設計產品則要多考慮一些細節。
#-------------
開發階段電圖
- 電腦USB連結Arduino再連接ESP8266
PC(USB) <->Arduino <-> ESP8266

(2) 電腦USB連結USB To serial再連接ESP8266
PC(USB) <->USB to TTL轉接板<-> ESP8266

資料來源: Getting Started with the ESP8266-12
執行階段電路圖
下面是執行階段的電路圖,當我們利用開發版完成程式問發後,我們可以將晶片及程式移植到正式產品上,此時我們可以簡化電路使成本降低維持最簡單的電路即可。

更多資訊請參考ESP8266的外部電源與線路問題這篇文章。

